








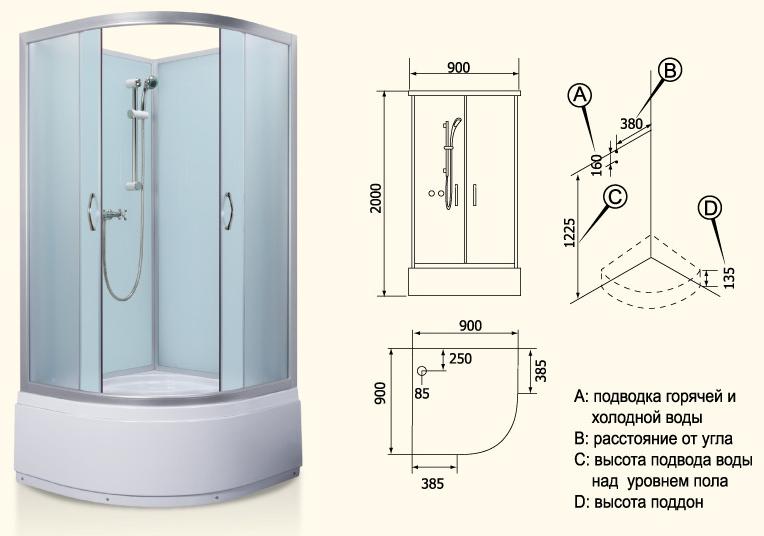
Properly connecting a shower enclosure is a complex process that requires a professional approach and an understanding of plumbing system principles. Over the years, I've compiled a collection of common mistakes made by amateur installers and developed my own installation method that guarantees long-lasting and trouble-free operation. In this guide, I'll share not only standard techniques but also little-known secrets typically shared only within the professional community.
Preparatory phase: planning and safety
Successful installation begins long before the booth is unpacked – with careful preparation and creating ideal working conditions. The first thing I do on-site is assess the condition of the room and ensure it meets technical requirements. I check the presence and functionality of ventilation – without adequate air exchange, even the highest-quality booth will become a source of mold and condensation problems. I inspect the electrical wiring – models with electrical equipment require grounding and an RCD.
- Ventilation – mandatory exhaust with a capacity of at least 100 m³/hour for effective removal of excess moisture
- Electrical safety - a separate line from the panel with a circuit breaker and a 10 mA RCD for models with electrical equipment
- Access to communications – convenient access to water supply, sewerage and electrical networks for maintenance and repair
- Foundation strength – the ability of the floor to withstand the weight of the cabin with water (at least 300 kg/m² for standard models)
I pay special attention to preparing my tools and materials. My kit always includes not only standard wrenches and screwdrivers, but also specialized tools—a pipe cutter for perfectly straight edges, a calibrator for finishing pipe ends, and a torque wrench for precisely tightening critical connections. I always use only high-quality sealants—sanitary-grade silicone compounds with antifungal additives.
Necessary tools and materials
- A set of wrenches and screwdrivers – including socket heads and a torque wrench for critical connections
- Construction level – preferably laser for precise positioning of all elements
- A hammer drill with diamond core bits – for precise drilling of holes in ceramic tiles
- Silicone plumbing sealant – exclusively high-quality compounds from trusted manufacturers
- FUM tape or flax for sealing threaded connections - flax with paste for water, FUM tape for gas
- Flexible water hoses – only high-quality models with braided metal braiding
Before starting work, I always turn off the water and electricity to the risers. Many people ignore this simple rule, which leads to tragic consequences. I once had to deal with a flood caused by an attempt to install a shower stall without shutting off the water—a stripped thread on an old pipe led to three floors being flooded. Now I always personally check the shutoffs and place warning signs on the panels.
Assembling a shower enclosure: the basis for a successful installation
Before connecting, it's necessary to properly assemble the cabin according to the manufacturer's instructions. I always start with a thorough review of the technical documentation—even an experienced technician can miss important details about a specific model. I unpack all the components and check the completeness—missing even a small part can halt the entire installation process.

Assemble the frame (if included in the design) on a level surface, using a spirit level. I tighten all connections gradually and evenly – first, I tighten all the screws, then tighten them in a crisscross pattern. This prevents distortion and stress in the structure. I pay special attention to installing the tray on the adjustable feet – they must be level, accurate to the millimeter.
Assembly stages
- Unpacking and checking the completeness – checking against the technical data sheet, inspecting for damage
- Assembly of the frame (if provided for by the design) - on a flat surface with constant control of the geometry
- Installing the tray on adjustable feet allows precise leveling in all directions
- Installation of rear and side panels – using standard fasteners and seals
- Installing doors and checking their operation – adjusting rollers, checking smooth running
- Installation of internal equipment (shelves, holders) – according to the manufacturer’s diagram
When assembling glass elements, I use only special suction cups and protective gloves. Glass, even tempered, requires careful handling—the slightest crack along the edge can lead to the destruction of the entire panel. I use damping gaskets for all glass connections—they compensate for thermal expansion and prevent point loads.
Installing and leveling the pallet
Proper installation of the shower tray is the foundation for the reliable operation of the entire system. The slightest tilt or instability will lead to drainage problems, leaks, and premature wear of the equipment. I always install it using a laser level—a regular bubble level doesn't provide the necessary accuracy for large shower trays.

Adjustable feet are a real lifesaver for professionals working in homes with uneven floors. But they also require careful adjustment. I adjust the feet not only for level but also for the intended load—when a person stands in the tray, the structure may sag slightly. Therefore, I add 1-2 mm in the center to compensate for any deflection. After adjustment, I always secure them with lock nuts—vibrations from the whirlpool system or dropped objects can disrupt the settings.
Installation requirements
- Strict horizontality – deviation of no more than 1 mm per meter of length in any direction
- Stability of position – no wobbling or movement under loads up to 150 kg
- Adjustable leg height – precise adjustment to floor level, taking into account the thickness of the floor covering
- Access to the drain connection – the possibility of connection to the sewer system and subsequent maintenance
For heavy cast iron or stone shower trays, I always secure them to the floor using anchor bolts or chemical anchors, depending on the subfloor material. For wooden floors, I use through-bolts with washers, while for concrete floors, I use expansion anchors. It's important not to overtighten the fasteners, as excessive force can damage the shower tray, especially acrylic ones.
Alignment technology
- Installing the pallet in the intended location - preliminary assessment of the position relative to communications
- Adjusting the feet to achieve horizontal leveling – sequential adjustment with level control
- Locking with lock nuts ensures secure fixation without the possibility of spontaneous loosening.
- Stability testing – testing under a load of 100-150 kg at different points
- If necessary, additional fixation to the floor is required for heavy models or in the presence of vibration loads.
After installation, I always check the drain operation by pouring a few liters of water into the tray and observing the speed and direction of the flow. The water should drain completely into the drain hole without any stagnant areas. If any puddles remain, the tray needs further adjustment. This simple test allows you to identify problems early, when they're easy to fix.
Connection to the sewer system
Efficient drainage is a key installation step, ensuring the absence of blockages and odors. I always begin with an assessment of the existing sewer system—old cast-iron pipes can have significant deposits inside, reducing their capacity. In such cases, I recommend replacing the section up to the riser with modern plastic pipes.
Pipe slope is a parameter that tolerates no compromise. Too small an angle (less than 1 cm per meter) will lead to stagnant water and rapid clogs. Too large an angle (more than 3 cm per meter) will lead to rapid accumulation of dirt in the trap and disruption of the water seal. I always maintain a slope of 2 cm per meter—this is the optimal value for gravity drainage with minimal risk of clogs.
Requirements for the drainage system
- Pipe slope – 2 cm per meter to ensure gravity flow without stagnation and disruption of the water seal
- Pipe diameter – not less than 40-50 mm for standard cabins, 70-80 mm for high-capacity models
- Tightness of connections – complete absence of leaks at a test pressure of 0.5 atm
- Access for maintenance – the ability to clear blockages without dismantling the cabin
When connecting to a cast-iron sewer system, I use special adapter sleeves—they ensure a secure connection without the risk of damaging the old pipes. I make all bends using 45-degree elbows—they create less flow resistance than 90-degree elbows. On long sections, I install inspection hatches—they allow for clearing blockages without disassembling the entire system.
Options for organizing drainage
- Direct connection – when the sewerage system is located close, the minimum length of the connecting pipe
- Using flexible hoses - for remote risers, but only high-quality corrugated pipes
- With a sewage pump – when the cabin is located below the riser level, it requires a separate power supply
I pay special attention to the installation of the water trap—it protects the room from sewer odors. Shower stalls typically use a bottle trap—it's compact and effective, but requires regular cleaning. I always recommend models with an inspection hole—it allows you to clear a blockage without disassembling the trap. After assembly, I always check the presence and level of water in the water trap—without it, the system won't function properly.
Features of connecting a siphon
- A water seal is required to protect against odors, minimum height 5-7 cm
- High-quality sealing of joints – use of standard seals and additional lubrication
- Check for leaks before final fixation by filling the system with water for 15-20 minutes
- Providing thermal compensators when using plastic pipes – expansion gaps of 5-10 mm
After connecting, I perform a mandatory leak test: after plugging the drain, I fill the system with water to the overflow level. I observe for 15-20 minutes; if the level doesn't drop, the connections are sealed. This test allows me to detect even the smallest leaks that aren't visible during a routine inspection. Only after a successful test do I proceed to the next stage of the work.
Connection to the water supply system
Establishing a reliable water supply is key to the smooth operation of your shower enclosure. I begin by assessing the condition of the existing pipes—steel pipes often have significant deposits inside, which reduces their flow capacity. In such cases, I recommend replacing the section before connecting the enclosure—this ensures stable water pressure and the absence of contaminants in the new equipment.

I always install ball valves on both hot and cold water lines. They allow the shower cabin to be shut off for maintenance without shutting off the water to the entire apartment. I install coarse filters after the valves to protect the ceramic faucet cartridges from sand and scale. For models with electronic controls, I also install a pressure reducer to protect the equipment from water hammer.
Preparatory work
- Turning off the water in the risers is a mandatory procedure, even if the work is being carried out on one connection
- Relieving pressure in the system (opening taps) – completely removing water from the pipes before starting work
- Preparation of connection points – cutting threads, installing adapters, cleaning surfaces
- Installing coarse filters – protecting ceramic mixer cartridges from mechanical impurities
For connections, I use only high-quality flexible hoses with metal braiding—they can withstand high pressure and don't crack over time. The hoses should be 10-15 cm long—this allows for any movement in the structure and facilitates future maintenance. I seal all threaded connections with flax paste—this proven method ensures a reliable seal for decades.
Connection technology
- Installation of shut-off valves on the supply lines - ball valves with union nut for ease of maintenance
- Installation of fittings for connecting flexible hoses - adapters from threads to hose nipples
- Connecting hoses to the cabin mixer – strictly observing the hot/cold water markings
- Sealing of all threaded connections – flax with paste or fum tape depending on the type of thread
- Step-by-step leak testing – first without pressure, then at an operating pressure of 3-4 atm
I take special care when connecting thermostatic mixers—it's crucial not to mix up the connections. Hot water is always connected to the left, cold water to the right (as viewed from the user's side). After connecting, I always check the thermostat's operation—for smooth adjustment, quick response to changes in settings, and stable temperature maintenance.
Features for different types of mixers
- Built-in mixers – connection to existing wiring via special adapters
- Outdoor faucets – organization of separate connections with output through the walls of the cabin
- Thermostatic mixers – precise connection of hot/cold water, calibration check
After completing the connections, I perform a comprehensive system check. I apply water gradually, starting with minimum pressure, inspecting all connections. I check the operation of the faucet in all modes—the overhead shower, the hand shower, and switching between them. I pay special attention to the absence of leaks at the connections—even a small drip can lead to serious problems over time.
Installation of walls and doors
Assembling the enclosing structures requires precision and accuracy—the slightest misalignment will lead to problems opening the doors and leaking. I start with installing the back wall—it serves as a reference point for all subsequent elements. I check verticality with a plumb line—a bubble level can be inaccurate over long distances.
I carefully seal all joints between the panels and the tray with sanitary silicone. I apply it in an even, seamless layer, then smooth it with a damp finger or a special spatula. I remove any excess immediately—dried silicone is very difficult to remove without damaging the surfaces. I pay special attention to the inside corners, as these are where leaks most often occur.
Installation of walls
- Checking the verticality of each element – deviation of no more than 1 mm per meter of height
- Sealing the joints with silicone sealant - a continuous seam 3-5 mm thick
- Uniform tightening of fasteners - sequential tightening of screws in a crosswise pattern
- Checking the absence of stress in glass/plastic – free position without forced deformations
When installing glass elements, I use only standard fasteners and seals—homemade solutions don't provide the necessary reliability. All metal parts must be stainless steel or have a reliable anti-corrosion coating. After tightening all connections, I double-check the geometry of the structure—the distances between parallel elements must be uniform across the entire height.
Installation of door systems
- Precise adjustment of roller mechanisms – smooth movement without effort and extraneous sounds
- Check for ease of movement and tightness of fit - a uniform gap of 3-4 mm around the entire perimeter
- Setting up opening limiters – preventing doors from hitting walls or other obstacles
- Lubrication of moving parts – special silicone compounds.
Sliding systems require particularly precise adjustment. The tracks must be strictly parallel to each other and aligned. The rollers must move easily, without binding or play. After installation, I test the doors at different temperatures—materials expand and contract with temperature changes, which can affect ease of operation.
I adjust swing doors so they don't open or close on their own. The hinges should be adjusted with a light force—enough to hold the door in any position, but not so tight that it prevents it from opening. I check the operation of the door closer (if any)—it closes smoothly and without any sudden movements.
Connecting electrical equipment
Electrical work requires special care and adherence to safety regulations. For models with electrical equipment, I always install a separate line from the control panel—this prevents overloading the existing wiring and ensures safety. I select the cable cross-section based on the equipment's power—2.5 mm² is sufficient for most cabins, and 4 mm² for models with a steam generator.
I always install an RCD with a tripping current of 10 mA—this is a necessary safety requirement for wet areas. I select a circuit breaker based on the rated current of the equipment, with a 20-30% reserve. All connections are made in junction boxes with mandatory insulation—twists and caps are not allowed.
Electrical wiring requirements
- Separate line – direct connection to the panel with its own circuit breaker and RCD
- Cable cross-section – 2.5 mm² for standard equipment, 4 mm² for powerful steam generators
- Protective automation – 10 mA RCD and a circuit breaker of the corresponding rating
- Grounding – mandatory for all metal elements and electrical equipment
Lighting fixtures in the shower stall must have a protection rating of at least IP44—this ensures their safety in a humid environment. I place all switches and sockets at least 60 cm from the shower area—this is a requirement of the Electrical Installation Code (PUE). For low-voltage lighting systems, I install the transformer in a dry location—usually outside the bathroom.
Features for different functions
- Hydromassage - separate circuit breaker for the pump, protection against dry running«
- Steam generator - reinforced line taking into account high power, separate circuit breaker
- Backlight – low-voltage systems with a transformer located outside the humidity zone
- Audio system – a standard grounded socket at least 60 cm from the shower area
When connecting a steam generator, I pay special attention to the condensate drainage system—it should drain into the sewer system and not accumulate under the cabin. For hydromassage systems, I check the water pressure—most pumps require at least 2 atm of inlet pressure. I connect audio systems via an isolation transformer—this eliminates the risk of electric shock.
Safety rules
- All work must be carried out with the power supply disconnected - check for the absence of voltage with an indicator
- Use only moisture-proof connections - terminals with protective covers, sealed boxes
- Place sockets at least 60 cm away from the shower area – strict compliance with the Electrical Installation Code (PUE)
- Provide access to emergency shutdown circuit breakers – free access to the panel
After completing the electrical installation, I perform a comprehensive check of all systems. I check the insulation resistance with a megohmmeter – it should be at least 1 megohm. I test the RCD operation by pressing the test button and creating a controlled leak. I check the grounding of all metal components – the resistance should be close to zero. Only after all tests have passed do I apply power to the equipment.
Commissioning works
The final stage is checking the functionality of all systems and adjusting the equipment for optimal operation. I begin by checking the water connections for leaks – applying water under operating pressure and carefully inspecting all joints. I pay special attention to the flexible hose connections and threaded connections – these are where leaks most often occur.

I test the faucet in all modes – checking for smooth temperature control, switching between the overhead and handheld showers, and the thermostat (if applicable). I pay special attention to temperature stability – it shouldn't fluctuate with changes in system pressure. I check the operation of the rain shower system – for even water distribution and no "dead" zones.
Testing sequence
- Checking the tightness of water connections – visual inspection at an operating pressure of 3-4 atm
- Test the operation of the mixer and switching modes - all functions should work smoothly and without jamming
- Checking the drainage system and water trap – flow rate, absence of stagnation, water level in the siphon
- Electrical equipment testing (step-by-step) – lighting, hydromassage, steam generator, audio system
- Checking the operation of doors and mechanisms – smooth running, tight seal, operation of door closers
For cabins with additional features, I perform extensive testing. I test the hydromassage in all modes, from gentle to intense. I test the steam generator for uniform steam distribution and temperature control accuracy. I check the audio system for sound quality and remote control operation. I save all settings according to the manufacturer's instructions.
Control checklist
- No leaks at joints - dry joints after 30 minutes of pressure testing
- Stable operation of the mixer and temperature maintenance – fluctuations of no more than ±1°C
- Fast water drainage without stagnation – complete removal of water from the tray in 1-2 minutes
- Silent operation of pumps and fans – no vibrations or extraneous sounds
- Correct operation of electronic control systems – precise execution of programmed functions
After all tests are completed, I brief users, explaining the equipment's operating features, care instructions, and daily and periodic maintenance procedures. I provide contact information for consultations—this helps avoid problems caused by improper operation. Only after a full inspection do I consider the job complete.
Features of connecting cabins with additional functions
The specifics of installing multifunctional models require additional knowledge and skills. Each additional feature introduces its own adjustments to the installation process and requires a special approach to connection and configuration.
Hydromassage cabins
- Correct connection of nozzles to the water line – observing the flow direction
- Installation and adjustment of pumping equipment – ensuring productivity and pressure
- Organizing a water filtration system – protecting nozzles from clogging
- Checking the operation of the air valves – ensuring proper mixing of water and air
Hydromassage systems require particularly thorough leak testing—high system pressure increases the risk of leaks. After connecting, I perform a test run of the pump without any load—checking operation at all speeds and for vibrations and extraneous noise. Then I test the system with water—checking for uniform water flow through all nozzles and the proper operation of the intensity controls.
Steam bath cabins
- Install the steam generator in a dry place - away from direct exposure to moisture
- Organization of condensate drainage – condensate drainage into the sewer system
- Checking the operation of temperature and humidity sensors – accuracy of readings and response
- Safety system testing - automatic shutdown in case of overheating
Steam generators require a separate power supply—usually high-power units consuming 3-6 kW. The cable cross-section must match the power rating—usually 4-6 mm². I always install a separate circuit breaker and RCD. When installing the steam line, I maintain a slope of at least 1 cm per meter—this ensures condensate drains back into the generator. After installation, I test the entire system—speed of ramp-up, temperature and humidity stability, and timer accuracy.
Cabins with tropical shower
- Ensuring sufficient water pressure - at least 2.5-3 atm for high-quality work
- Proper mounting of a heavy watering can – secure fixation taking into account its weight
- Checking the uniformity of water distribution – absence of «dead» zones
Tropical shower systems require a higher water flow rate—typically 15-20 l/min compared to 8-10 l/min for standard shower heads. This should be taken into account when assessing the plumbing system's capabilities. If the pressure or flow rate is insufficient, the system will not function properly. After installation, I check for even water distribution across the entire surface—all openings should produce a uniform stream of water.
Common mistakes and how to avoid them
Knowing the typical mistakes helps avoid problems during installation and subsequent operation. Over the years, I've compiled a collection of the most common mistakes made by both novice and experienced professionals.
Errors when connecting to the sewer system
- Insufficient slope of pipes – stagnation of water, rapid formation of blockages
- Lack of a water seal – penetration of odors from the sewer into the room
- Use of poor quality seals - leaks occur shortly after installation
The most critical mistake is an incorrect slope of the drain pipe. Many plumbers rely on eyeballing, which leads to either stagnant water (if the slope is insufficient) or a broken water seal (if the slope is too steep). I always use a laser level to accurately set the angle—2 cm per meter is optimal.
Errors when connecting water supply
- Hot and cold water mixing up - incorrect thermostat operation
- Insufficient sealing of threaded connections – leaks due to vibrations and temperature changes
- Lack of shut-off valves – difficulties with maintenance and repair
Mixing up the water supply lines is a common mistake when connecting thermostatic mixer taps. This results in the thermostat failing to regulate the temperature properly—when attempting to set a comfortable temperature, the water flows either too hot or too cold. I always label the water supply lines immediately after disconnecting them—this prevents confusion.
Electrical Mistakes
- Inconsistency between the cable cross-section and the equipment power – overheating of the wiring, risk of fire
- Lack of grounding – risk of electric shock, especially in damp areas
- Placing sockets in an unacceptable proximity to water is a direct violation of the Electrical Installation Code (PUE).
The most dangerous mistake is neglecting grounding. In a damp room, the risk of electric shock is significantly higher, and the consequences can be tragic. I always check the presence and quality of grounding before connecting any electrical equipment. I use a specialized device to measure grounding resistance; it should be no more than 4 ohms.
Service and operation
Proper operation and regular maintenance extend the life of the equipment and prevent most problems. After installation, I always provide detailed instructions on cabin maintenance, from daily procedures to periodic maintenance.
Regular maintenance
- Cleaning filters and nozzles – preventing clogs and reduced performance
- Checking the tightness of connections – timely detection and elimination of leaks
- Lubrication of moving mechanisms – maintaining smooth operation of doors and adjustments
- Cleaning the drainage system – preventing blockages and unpleasant odors
Daily maintenance takes no more than 5 minutes, but its regularity determines the cabin's condition over the years. I recommend rinsing all surfaces with warm water after each use—this removes detergent residue and prevents limescale buildup. Wipe the surfaces once a week with a special cleaning product designed for the corresponding materials.
Seasonal maintenance
- Checking the operation of electronic systems – testing all functions and settings
- Testing protective automation – checking the operation of RCDs and circuit breakers
- Assessing the condition of seals and gaskets – replace at the first signs of aging
I recommend performing a preventative inspection of all systems every six months. Check the tightness of connections, the operation of the drainage system, and the condition of the door seals. For electronically controlled cabins, test all programs and settings. For hydromassage systems, check the pump operation in all modes and clean the nozzles of any deposits.
With proper care and regular maintenance, a high-quality shower enclosure will last 15-20 years without major repairs. However, even the most reliable equipment requires attention and care – neglecting simple operating instructions can significantly shorten this lifespan. Therefore, I always insist on regular maintenance – it's an investment in the longevity of your equipment.
Conclusion: a professional approach to installation
Connecting a shower enclosure is a complex task that requires technical knowledge, precision, and an understanding of the interconnections between various systems. Even if you decide to do the installation yourself, don't neglect to consult with specialists at complex stages, especially when working with electrical wiring and complex electronic equipment.
Remember: a high-quality shower installation not only ensures daily comfort but also guarantees the safety and durability of the equipment. Investing in professional installation will pay off with years of trouble-free use and enjoyable showering. Don't skimp on what ensures your daily comfort and safety—the savings can be costly.