








Ceramic tile is the undisputed leader among bathroom finishing materials. Its popularity stems from its sheer practicality: it's impervious to water, steam, and temperature fluctuations, easy to clean, and lasts for decades. However, a visit to a specialized showroom can be a bit overwhelming, even for the most knowledgeable: thousands of collections, dozens of manufacturers, and vast price differences. How can you avoid confusion and make the right choice that meets aesthetics, quality, and budget? You need to approach it systematically: first, understand the types and technical specifications, then navigate the markings, and only then delve into the world of design and choose a manufacturer. Let's start with the basics.
Ceramics, tiles, porcelain tiles: what's the difference?
These terms are often used interchangeably, but there are technical differences between them. Ceramic tile (ceramics) is a general term for all finishing materials made from fired clay with mineral additives. Ceramic tiles are a type of ceramic tile that undergoes a double firing process: first, the base (body) is fired, then a glaze is applied, and the tile is fired again. Ceramic tiles are generally more porous and less durable, making them ideal for walls. Porcelain stoneware (granite) is a material created using a different technology. It is pressed under extreme pressure from a mixture of white clay, quartz, feldspar, and natural dyes, and then fired at a very high temperature (approximately 1300°C). The result is an incredibly dense, virtually non-porous material with a uniform structure throughout its entire thickness. It is stronger and more durable than ceramic tiles and is suitable for both walls and floors, including high-traffic areas.

There are other, less common types. Cotto is an unglazed, porous tile made from red gota, with a distinctive natural color and texture that requires impregnation. Majolica is a hand-painted tile on wet glaze, an expensive decorative element. Clinker is a tile fired to a vitrified finish, very dense and frost-resistant, often used for facades but also suitable for bathroom floors. When choosing tiles for a standard city apartment, focus on wall tiles and porcelain floor tiles, as they offer the most balanced option in terms of price and quality.
- Tiles (for walls): Lighter, often with a glossy glaze and a wide range of decors. Not suitable for flooring due to its lack of durability and abrasion resistance.
- Porcelain tiles (for floors/walls): Very heavy and durable, with low water absorption (less than 0.5%) and high abrasion resistance. Available in polished, matte, and textured finishes.
- Key indicator: Water absorption. For bathroom walls, up to 10% is acceptable; for floors, no more than 3%; ideally, less than 0.5% (for porcelain tiles).
- To the touch: The back of a quality tile should be rough to ensure better adhesion to the adhesive; in porcelain tiles, it often has marks from the conveyor belt.
Labeling language: deciphering the pictograms
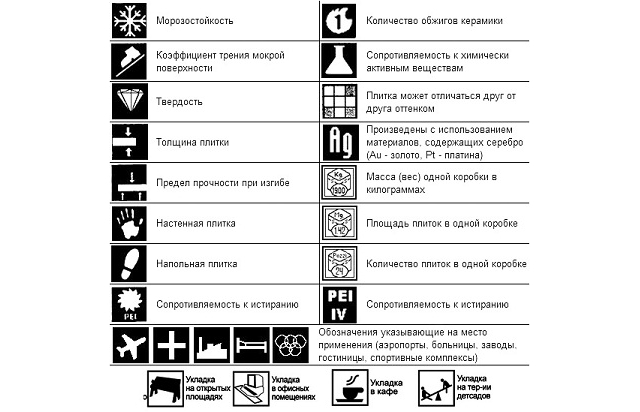
A tile box is its passport. Knowing how to read the markings will save you a ton of time and prevent mistakes. The first thing to look for is the icon depicting a palm or a foot. A palm means the tile is intended exclusively for wall use, while a foot is for floor use. Confused, you risk: wall tiles on the floor will quickly crack, while floor tiles on the wall will create unnecessary stress and be more difficult to install. The next important icon is the snowflake. It indicates frost resistance, which is only relevant for tiles that will be used on unheated balconies or in private homes with access to the street. For a typical apartment bathroom, this parameter is unimportant.

One of the key parameters is abrasion resistance (wear resistance), denoted by the abbreviation PEI (Porcelain Enamel Institute) and Roman numerals from I to V. PEI I — tiles for walls only. PEI II — for floors in rooms with light traffic (bathroom, bedroom). PEI III - suitable for any living space, including the kitchen and hallway. PEI IV and V - for commercial and public spaces with high traffic. For a bathroom in an apartment, it is enough PEI II for the floor, but if the family is large, it is better to take PEI III. Also pay attention to the coefficient of friction (anti-slip). It is designated by letters from A (slippery) to C (very safe). For bathroom floors, especially if you have elderly or children, choose tiles rated R10 or R11 (European classification) or with a coefficient of friction of at least B.
- Destination marking: Palm symbol = wall. Foot symbol = floor. Crossed-out foot = no floor.
- Wear resistance class (PEI): PEI I — walls; PEI II — floor in the bathroom/bedroom; PEI III — the floor in any living space.
- Chemical resistance: It is designated by letters AA (highest), A, B, C, D (lowest). For the bathroom, choose AA or A.
- Size and caliber: In addition to the stated size (for example, 30×30 cm), the caliber is indicated (CAL). Tiles of the same caliber have the same actual size, which is important for even seams.

Design and visual effects: how to make the right choice
Once the technical details are resolved, the most enjoyable part begins: choosing a design. It's important to consider not only personal preference but also the size of the room. A classic rule: light and glossy tiles visually enlarge the space, while dark and matte tiles make it appear smaller. For a small bathroom, it's best to choose light colors—white, beige, light gray, and pastel shades. Large patterns or contrasting tiles will be overwhelming in such a room. In a spacious room, you can experiment with dark, rich colors, large-format tiles (60x60 cm and larger), and bright accents. Tile format also plays a role. Square tiles (30x30, 45x45) are classic and easy to install. Rectangular tiles (e.g., 20x60 cm), laid horizontally, visually expand the wall, while vertical tiles add height.
A modern trend is tiles imitating natural materials: marble, concrete, wood, metal. Digital printing technologies (digital print) can achieve a striking resemblance. Wood-effect tiles in the bathroom look unusual and cozy, but choose options with a protective matte or textured finish to prevent slipperiness. Don't forget about decor—borders, panels, and mosaic inserts. They help break up the monotony and add accents. However, it's important not to overdo it with decor: one or two accent elements for the entire room are usually enough. Another technique is to combine matte and glossy tiles of the same color. For example, matte on the floor (safer) and glossy on the walls (easier to clean and reflective).
- For a small bathroom: Light, glossy tiles in medium or small formats (10x20, 20x20). Minimal decoration, plain walls or vertical stripes.
- For a spacious bathroom: You can use dark tones, large formats (60×60, 60×120), contrasting combinations (for example, dark floor + light walls).
- Imitations: Marble-effect tiles add a touch of luxury, concrete-effect tiles lend a loft feel, and wood-effect tiles lend a Scandinavian or eco-friendly style. Check for slip resistance.
- Live check: A sample in a store looks different under artificial light than it does at home. Keep a sample for a few days to see how the tile looks under your lighting, morning and evening.
Manufacturers: from elite Spanish tiles to budget Belarusian ones
The geography of tile production is almost always a guarantee of a certain level of quality, design and, of course, price. Spanish tiles (Valencia, Gres de Aragon, Pamesa) is synonymous with the highest quality, innovative designs, and premium prices. The Spanish are trendsetters in ceramics, pioneering new formats and printing technologies. Italian tiles (Imola, Marazzi, Atlas Concorde) is impeccable style, exquisite design, and also high prices. Italians often emphasize artistic collections, which are works of art in themselves.
If you're on a budget, don't worry. Polish manufacturers offer excellent quality at reasonable prices.Cersanit, Opoczno, Paradyz). Polish tiles have long won the trust of Russian consumers: they meet European standards, have good designs, and are available in most home improvement stores. Belarusian tiles (Keramin, Berezakeramika) are an even more budget-friendly, yet still quite high-quality option. The design may be simpler and the selection smaller, but they are just as good in terms of basic performance characteristics. Russian manufacturers (Shakhtinsky, Uralceramics, Sokol) also offer inexpensive solutions, often imitating popular European collections.


- Premium segment (Spanish, Italian): High price, exclusive design, advanced technologies (for example, tiles with 3D effect, ultra HD Printing). A purchase is an investment in the interior for 20-30 years.
- Mid-price segment (Polish): Optimal price-quality ratio. Wide selection of marble, wood, and stone-effect collections. You can often find all the necessary hardware (corners, baseboards) in a single style.
- Budget segment (Belarusian, Russian): Low price, basic designs, good technical characteristics. Suitable for temporary renovations or spaces where aesthetics are not a priority (for example, a bathroom in a country house).
- Batch check: Regardless of the country of manufacture, when purchasing tiles, open two or three boxes from different pallets and compare them. There shouldn't be any significant differences in shade (tone) or size (caliber).
Practical tips for purchasing and calculating quantities
Before going to the store, make a precise floor plan with dimensions. Mark all elements that won't be tiled (doorways, windows, mirrors). You can calculate the number of tiles using the formula: (wall area / area of one tile) + 10-15% for extra space. This extra space is needed for trimming, breakage, and possible future repairs. The calculation is similar for the floor. If you plan to lay the tiles staggered (or diagonally), the extra space increases to 15-20%. Don't forget to buy all the necessary materials in advance: adhesive (for wet areas), grout (water-resistant with fungicides), and spacers for forming joints. It's best to use the same brand of adhesive and grout as the tiles, or those recommended by the seller.

When inspecting tiles in the store, perform a few simple tests. Place two tiles from the same lot face-to-face – there should be no gap, indicating good geometry. Run a coin or key across the glossy surface (with the seller's permission, of course) – there shouldn't be any scratches on the high-quality glaze. Look at the tile at an angle – the surface should be smooth, without dents or ripples. Check with the seller whether the tiles are pre-sorted by shade (marked "Grade 1") and whether all the necessary elements of the collection (decorative elements, borders, floor tiles) are in stock, so you don't have to buy additional tiles from a different lot that may have a different color.
- Calculation: Wall area: perimeter length x height, minus door/window area. Minimum 10% for stock; 15% for complex layouts.
- Purchase: Buy all tiles at once, from a single batch (the batch number is indicated on the box). Check the return policy for unopened boxes.
- Strength test: Carefully drop a small metal object (like a nut) onto the tile. A high-quality tile won't crack.
- The final step: Ask the seller for care instructions for the type of tile you have chosen and recommendations for cleaning the grout from the joints after installation.