






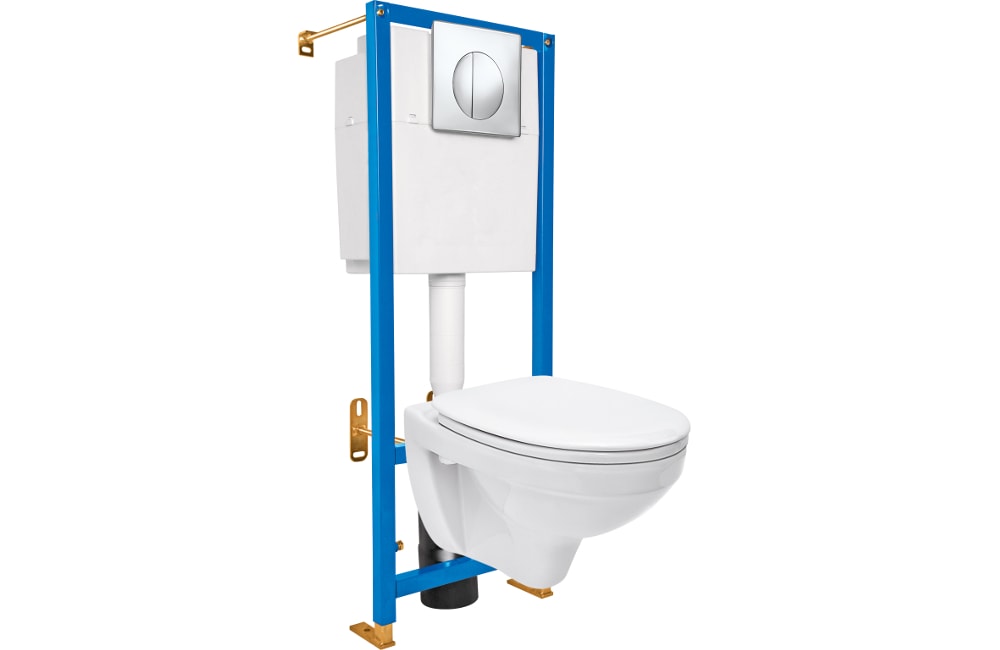
Bathroom renovations are always about achieving the ideal: maximum functionality, hygiene, and aesthetics in a minimal amount of space. In pursuit of this ideal, bulky toilets with protruding cisterns have been replaced by an elegant and technologically advanced system—the wall-hung toilet with a wall-hung installation. At first glance, it's simply a toilet "hanging" on the wall. But behind this apparent lightness lies a sophisticated engineering design that conceals all the plumbing and fittings within the wall, leaving only the impeccably smooth bowl and neat flush button visible. This approach radically changes the perception of space: the bathroom appears more spacious and modern, it becomes easier to clean, and the toilet itself gains unprecedented weight capacity.
So what is a wall-hung toilet? It's not just a concealed cistern, as many people think. It's a complete installation kit consisting of a rigid, galvanized steel frame to which the toilet bowl, plastic cistern, flush fittings, and water supply components are attached. This entire structure is mounted to a load-bearing wall or floor, then covered with drywall, wall panels, or brickwork, and only then is the toilet bowl itself installed. The wall-hung toilet is the skeleton of the system, guaranteeing its strength and stability. Manufacturers claim that a properly installed frame can withstand a load of up to 400 kg, making the wall-hung toilet one of the most reliable plumbing fixtures.

The advantages of this solution are obvious. First, it's impeccably hygienic. The toilet doesn't touch the floor, allowing you to clean underneath without having to go around legs or hard-to-reach areas. The floor becomes completely level and seamless. Second, it saves space. The toilet itself is more compact than a floor-standing toilet, and the hidden cistern frees up the space above it, which can be used for shelves, cabinets, or simply left free for a feeling of airiness. Third, it's aesthetically pleasing. The minimalist design, with no visible pipes or connections, meets the most stringent standards of modern interior design. Fourth, it offers a variety of installation heights. The frame can be mounted at any height, which is especially important for people with disabilities or families with small children—the toilet can be adjusted to the user's height.
However, there are some nuances. Installing the system is a complex task that requires precise calculations and skill. It involves extensive work, such as cutting grooves in the walls (if pipes need to be hidden) and constructing a false wall out of plasterboard or masonry. This increases the cost and time of the repair. Furthermore, access to the cistern mechanisms is difficult in the event of a breakdown—the decorative panel must be dismantled. Therefore, the choice of the system itself and its fittings must be approached with particular care—they must be extremely reliable.
Types of installations: frame and block systems, their features and selection
All wall-hung toilet systems are divided into two fundamentally different types: frame-mounted and modular. Understanding their differences is key to choosing the right one for your bathroom.
Frame installation The WC frame is a versatile and widely used system. It is based on a welded frame made of thick galvanized steel, reminiscent of scaffolding. A plastic cistern is attached to this frame with adjustable brackets, and the frame itself is firmly secured to the floor and walls (or just the wall) with heavy-duty anchor bolts. The frame's main advantage is its adaptability. It can be installed virtually anywhere, regardless of the material or condition of the walls, as long as it has a support point on the floor or a load-bearing wall. The frame allows for precise adjustment of the toilet's height and projection, which is crucial for ease of use.

Frame systems, in turn, are divided by the type of fastening:
- Floor mounting: The frame rests on the floor and is secured to it with anchors. The wall serves only for additional stabilization. This type is the most reliable and is recommended for walls made of fragile materials (drywall, foam concrete).
- Wall mount: The frame "hangs" on the load-bearing wall, and the legs just touch the floor for stability. Requires a very strong load-bearing wall (concrete, brick).
- Corner frames: Designed for corner installation, they allow for efficient use of space in small bathrooms.
Block installation (monoblock) A modular system is a simpler and more compact solution. It consists of a prefabricated unit: a flush tank with a special flat shape, to which metal mounting studs are already welded. This unit is directly attached to the main wall with anchors and then sealed. The advantage of a modular system is the minimal depth of the structure (often just 10-15 cm), eliminating the need for a bulky false wall. It can simply be recessed into a pre-prepared niche or sealed with a thin layer of drywall.

However, the modular system has serious limitations. Firstly, it requires a strong, load-bearing wall (concrete or brick) capable of supporting the weight of the toilet and its occupant. It cannot be installed on a plasterboard partition. Secondly, there is no height adjustment—the unit is rigidly attached to the wall, making it impossible to change the toilet's position. Thirdly, the maximum load-bearing capacity is lower than with a frame. A modular installation is chosen when a suitable wall is available and maximum depth space is desired.
When choosing a toilet, pay attention to the quality of the metal and frame coating (the galvanization should be uniform, without burrs), the thickness of the steel profiles (at least 1.5-2 mm), and the complete set. A good set includes: a frame, a cistern, flush fittings, fasteners (anchors, studs, bolts), a decorative panel (or button), and a marking template. Make sure the fittings in the cistern are from a reputable manufacturer (Geberit, AlcaPlast, Siamp). They are responsible for the smooth operation of the flush.
Dimensions, layout and preparation for installation: important technical details
The installation dimensions are a parameter that should be coordinated with the bathroom plan at the earliest stage. The standard frame height (and, consequently, the height of the toilet bowl) is 82-84 cm from the finished floor to the top of the seat. This is an ergonomic height for an adult. However, many systems allow this height to be adjusted to a range of approximately 70-90 cm. If there are children or shorter people in the house, the toilet can be lowered. For public facilities, on the contrary, it is raised. The installation depth (the frame's protrusion from the wall) determines how far the toilet bowl will be from the wall. Typically, it is 15-22 cm. This should be taken into account when arranging furniture and planning the walkway.

The frame width is typically 50-60 cm. This is sufficient for mounting most wall-hung toilets. The most important dimension is the distance between the mounting studs on which the bowl will be hung. This distance is standardized and is most often 18 cm or 23 cm. This dimension must match the installation kit and the selected toilet! Otherwise, you simply won't be able to screw it in place. Plumbing manufacturers often produce toilets and installation kits in unified lines that fit together perfectly. Buying a set from a single brand is the safest option.
Preparation for installation begins with creating a detailed plan. It's important to determine the exact location of the toilet, taking into account convenient access (at least 60-70 cm of free space in front), the location of the sewer outlet, and the water supply pipe. The sewer pipe must be connected to the installation location of the toilet. If it's located elsewhere, it will need to be relocated, which will require remodeling. A ½-inch water supply pipe must be connected to the cistern connection. All utilities hidden in the wall must be made of high-quality, durable materials (polypropylene, metal-plastic), and all connections must be pressure-tested and leak-tested before installation.
The process of installing a frame installation: key stages and quality control
It's best to entrust the installation to an experienced plumber, but understanding the workflow is also helpful for oversight. The work is carried out in several stages.
1. Marking and fastening the frame. Using a template and level, mark the frame's position on the walls and floor. It's important to consider the thickness of the future cladding (tiles, panels) and the final floor covering. The frame is aligned strictly according to the level and secured with anchors. For concrete walls, use chemical anchors or expansion anchors with a diameter of 10-12 mm. The fastening must be absolutely secure.
2. Connecting communications. The water supply line is connected to the cistern (required through a ball valve to ensure shutoff). The cistern is connected to the sewer system via a special corrugated elbow or plastic pipe. All connections are sealed. At this stage, the first test is performed: water is supplied, the cistern is filled, the valves operate correctly, and the flush is checked. There should be no leaks.

3. Construction of a false structure. A frame made of metal drywall profiles is erected around the installation. It must be sturdy, as it will support the decorative panel with the button. The frame is covered with two layers of moisture-resistant drywall or a single layer of drywall and cement board (aquapanel). Holes are cut in the drywall for the future toilet mounting studs and the flush button.
4. Finishing and installation of the toilet. The false wall is plastered, primed, and covered with tiles, PVC panels, or painted with water-resistant paint. After finishing, the toilet bowl is hung on the protruding studs. It is secured with decorative caps and bolts, which are tightened with moderate force to prevent cracking the ceramic. The seat is installed. The flush button is mounted in the hole in the panel and connected to the stem of the cistern.
5. Final check. The flush is checked again for leaks and proper operation. The joint between the toilet and the wall is carefully filled with sanitary silicone sealant to create a hygienic and aesthetically pleasing joint.
Common mistakes include: poor frame mounting, incorrect height calculations (not taking into account the flooring thickness), a leaky connection to the sewer system, using non-waterproof drywall, skimping on cistern fittings, and attempting to install the system on weak partitions. Remember that the system built into the wall must be flawless, as any damage will result in extensive repairs down the road. With proper care, a wall-hung toilet with a wall-hung toilet is an investment in a clean, stylish, and incredibly practical bathroom for decades to come.