








A hydronic underfloor heating system offers more than just the comfort of warm tiles in the bathroom; it's a complete, economical, and very pleasant heating system for the entire home. Unlike radiators, which heat the air locally and create convection currents, underfloor heating evenly heats the entire area, providing the ideal temperature distribution for a person: warmer at the base, cooler at the head. I've installed such systems in several homes and can confidently say that with the right approach, this work can be done independently, saving a considerable amount on installation.
The key advantage of a water-based floor is its low operating costs, especially when using a gas boiler or heat pump as the heat source. The coolant in the pipes only heats up to 35-45°C, while radiators require 70-80°C. Energy savings can reach 20-30% of the original TP3T. However, there are some caveats: complex calculations, labor-intensive installation, and the need for a separate manifold cabinet and pump-mixing unit. It's also important to understand that this type of flooring raises the finished surface by at least 8-10 cm. Let's explore the entire process, from design to installation.
System design: calculations and selection of installation scheme
Before purchasing pipes, you need to create a design. Ideally, order a heating calculation from a specialist. They will determine the heat loss of each room, the required power, the spacing of the pipes, and their length. If you decide to do the calculations yourself, be prepared for errors. Basic rules: for primary heating, the system's power should compensate for the house's heat loss. For comfortable heating (for example, in a ground-floor bathroom), 80-100 W/sq.m is sufficient. The length of the pipe in one circuit (loop) should not exceed 100-120 meters; otherwise, the resistance will be too high, and the pump will not be able to pump the coolant.
There are two basic pipe layout patterns: the "snail" (spiral) and the "serpentine" (meander). The "snail" pattern provides more uniform heating because the supply and return pipes run parallel, smoothing out the temperature gradient. This is the preferred option for larger spaces. The "serpentine" pattern is easier to install, but the floor will be hotter at the beginning of the circuit than at the end. It is often used in small rooms or bathrooms. The pipe spacing (the distance between pipes) is typically 150-200 mm for the main heating system and 100-150 mm for comfort heating. Near external walls, the spacing is reduced to 100 mm to compensate for greater heat loss.
- Calculate the heat loss of the room (or take the average data for your region).
- Decide whether the floor will be the main source of heat or a comfortable heating source.
- Draw a pipe laying plan to scale, breaking it into contours (loops) up to 100-120 m long.
- Choose a laying pattern: «snail» for even heating, «snake» for simplicity.
- Determine the laying step: 150-200 mm for heating, 100-150 mm for underfloor heating, 100 mm for cold walls.
- Calculate the total pipe length for each circuit and for the entire system.

Selection of materials: pipes, insulation, manifold
The heart of the system is the pipes. Only special, seamless pipes made of cross-linked polyethylene (PEX) or heat-resistant polyethylene (PERT) are used for underfloor heating. Copper pipes are an excellent, but very expensive, option. The optimal diameter is 16 mm (outer) or 20 mm. Pipes are sold in 50-200 meter coils. Don't skimp on this material; buy pipes from reputable brands with an oxygen barrier (a layer that prevents oxygen diffusion, which causes corrosion of boiler components).
Thermal insulation is a mandatory layer. Its purpose is to direct heat upward into the room, rather than warming the ground or ceiling. In a private home on the ground, the minimum thickness of insulation (extruded polystyrene foam - EPS) should be 50-100 mm. On the floor between floors, 20-30 mm is sufficient. A waterproofing membrane is laid over the insulation, followed by a reinforcing mesh with a 100x100 or 150x150 mm mesh. It is convenient to secure pipes to this mesh with plastic clamps. An alternative is special underfloor heating mats with bosses that secure pipes without additional fasteners.
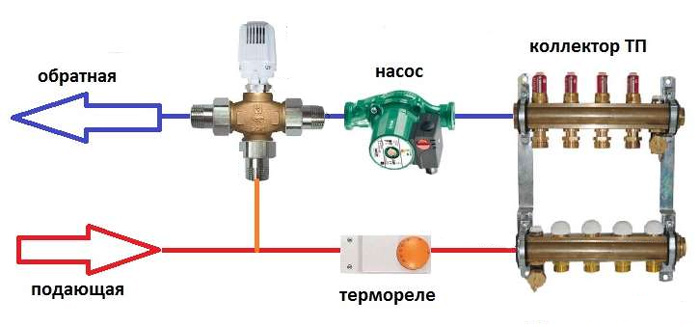
The manifold-mixing unit is the brain of the system. It consists of a manifold (comb) with flow meters and thermostatic valves, a circulation pump, a three-way or two-way mixing valve, a bypass, an air vent, and a drain cock. It's best to buy a complete unit from a reputable manufacturer. The manifold allows for independent regulation of the temperature and flow rate of the coolant in each circuit.
- Pipes: PEX or PERT, 16-20 mm in diameter, with an oxygen barrier. One coil for the entire circuit.
- Insulation: EPS with a density of at least 35 kg/m3. Thickness from 30 to 100 mm depending on the base.
- Fasteners: Reinforcing mesh + plastic clamps or mats with bosses.
- Collector unit: A ready-made set with a pump, mixer, combs and a safety group.
- Damper tape: It is laid along the perimeter of the room to compensate for the thermal expansion of the screed.

Installation on ground and concrete technology: step-by-step instructions
This is the most reliable and widespread method ("wet"). The work is carried out in the following order. First, the base is prepared: the soil is compacted, covered with a layer of aggregate (5-10 cm) and crushed stone (5-10 cm), each layer being compacted. Then, a rough leveling screed of lean concrete 5-7 cm thick is poured. After this dries, a layer of waterproofing (film) is laid, overlapping the walls. Then comes the insulation (EPS), followed by waterproofing or a thick film. A damper tape is attached around the perimeter.
Next, a reinforcing mesh is laid, and pipes are installed according to the layout diagram, securing them to the mesh with clamps. The pipes from the circuits are connected to the manifold cabinet. Important: at the entrance to the screed, the pipe must be fitted with a corrugated sleeve (corner protection) to protect it from kinks and thermal stress. After all circuits are installed, the system is pressure tested: filled with water and pressurized to 1.5-2 times the operating pressure (usually 4-6 bar). The system should remain at this pressure for 24 hours. If the pressure does not drop, the screed can be poured.
The screed is poured over the pipes under pressure! The screed thickness over the pipes is at least 3-5 cm. A cement-sand mixture with plasticizers for underfloor heating is used. Pour the screed in one go, per room. The screed dries for 28 days. Only after it has completely dried can you turn on the heating gradually. Never turn on the boiler at full power to speed up the drying process, as this will cause the screed to crack.
- Preparation of the base: compacted soil, sand and crushed stone cushion, rough screed.
- Waterproofing and installation of insulation (EPS) of the required thickness.
- Installation of damper tape around the perimeter.
- Laying the reinforcement mesh and fastening the underfloor heating pipes according to the diagram.
- Connecting circuits to the collector, installing the collector cabinet.
- Pressurizing the system with increased pressure to check for leaks.
- Pouring a finishing screed with a plasticizer at least 3-5 cm thick over the pipes.
- Natural drying of the screed for 28 days, observing the humidity regime.

Starting and setting up a heated floor system
Once the screed has completely dried, you can begin commissioning. This should be done gradually. Turn on the boiler to the minimum temperature (25-30°C) and allow the system to warm up for 24 hours. Then, increase the temperature by 5°C per day until you reach the design temperature (usually 35-45°C for the floor). This is necessary to ensure that the screed heats evenly and without internal stress. Using flow meters and thermostatic valves, balance the circuits on the manifold: adjust the coolant flow so that the return temperature from all circuits is approximately the same.
The system is controlled by room thermostats, which send signals to servo drives on the manifold, opening or closing the circuits. Once configured, the system is easy to forget about—it will operate automatically, maintaining a comfortable temperature. Remember to perform maintenance: check the system pressure once a year, clean the coarse filter before the pump, and bleed air through the air vents on the manifold if necessary.
Installing hydronic underfloor heating is a large-scale and challenging project. It requires time, money, and careful planning. But the result—even, comfortable, and economical heat throughout the entire home—more than pays for itself. If you're unsure of any aspect of the project (especially calculations and balancing), don't hesitate to consult a professional. It's better to pay for advice than to redo the entire screed due to a mistake.
