








Why the Right Sink Height is a Matter of Comfort and Health
The selection and installation of a sink often takes a back seat when planning a bathroom renovation. The focus is on tile design, the choice of bathtub or shower stall, and color scheme. As a result, installers, following the old-fashioned approach or template, install the sink at the standard height for older apartments—75-80 centimeters from the floor. However, this approach ignores the anthropometric measurements of individual users, leading to daily discomfort and even health problems. Constantly posturing while washing, brushing teeth, and shaving causes microtrauma to the spine, back muscles, and neck. Bending too low puts strain on the lumbar region, and straightening up and hitting your head on a protruding shelf risks cervical vertebrae. For children, a sink positioned too high makes hygiene procedures downright uncomfortable and unsafe.
Choosing the right height is, first and foremost, a matter of ergonomics. The goal is to maintain a straight back, relaxed shoulders, and a comfortable elbow angle. This not only minimizes strain but also makes the process more enjoyable and faster. Furthermore, an ergonomic height helps conserve space. A low-hanging sink eats up valuable space beneath it, preventing the placement of a washing machine, storage unit, or smart toilet flush system. A high-hanging sink creates an awkward gap between itself and the countertop (if present), where items are constantly falling. Therefore, determining the optimal height is not a whim, but a sensible calculation that improves quality of life and space efficiency.
Modern standards and individual calculations
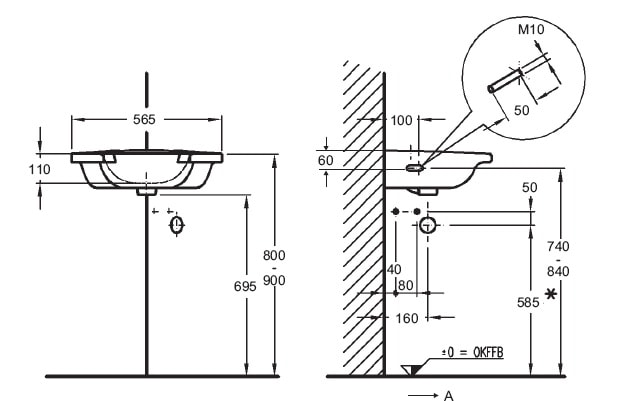
The historically established Soviet construction standard of 75-80 cm was based on average anthropometric data from the mid-20th century. Today, the average population height has increased, and approaches to living space ergonomics have also changed. Modern building codes and interior design recommendations define the optimal sink installation height as 80 to 90 cm from the finished floor to the top edge of the sink. However, blindly following even this broad range is a mistake. The ideal height is always individual and calculated for specific users.
The most accurate calculation method is based on measuring the distance from the floor to the bend of your elbow. To do this, stand up straight, relax your shoulders, and bend your elbow at a 90-degree angle, as if you were about to wash your face. Measuring the distance from the floor to the bottom of your elbow gives you a base measurement. Subtract 5-12 centimeters from this measurement. This difference compensates for the height of the sink itself (the depth of the bowl) and creates a comfortable clearance for manipulation. For example, if the distance to the elbow of a person 180 cm tall is approximately 105 cm, then if you choose a sink with a bowl height of 15 cm, the calculated installation height would be: 105 cm - 15 cm - 5 cm (allowance) = 85 cm. If there are several adults of different heights in the family, it's worth finding a happy medium by calculating the arithmetic mean of their individual measurements, or by focusing on the person who uses the bathroom most often.

- For families with children. Installing a second, low-height children's sink is a luxury not everyone can afford. A practical solution is to install the main sink at a comfortable height for adults and use a safe, stable step stool for the child. The stool should have rubber non-slip pads on the steps and base. An alternative is height-adjustable sinks, but these are considered premium and require very secure mounting.
- For people with disabilities. If a person in a wheelchair lives in the home, the sink should be installed at a height that allows access underneath. The standard height for this is 80 cm from the floor to the bottom of the wall-mounted cabinet or the open space beneath the sink. It's also important to ensure adequate legroom under the sink, and it's best to choose a pull-out faucet or one with a long, high spout.
- Paired with a cabinet or tabletop. If the sink is installed into a countertop (undermount or overhead), its top edge will be level with the countertop. Therefore, the calculated height is the height of the vanity itself. The standard for kitchen vanities is 85-87 cm, but for a bathroom vanity, you can make it 5-7 cm lower, especially for shorter users.
The influence of sink type on installation height
- Wall-hung sinks. These are the most popular and versatile. Their installation height is determined from the floor to the top of the basin. The advantage is the ability to precisely set any level. The disadvantage is that all plumbing and the siphon are exposed, requiring careful installation.
- Pedestal sinks (tulip). They have a fixed overall height, typically 80-85 cm. The pedestal conceals the trap but takes up space under the sink. Adjusting the height is difficult, unless you insert spacers under the pedestal or partially recess it into the floor.
- Vanity top sinks. A basin that is mounted on top of a countertop. The overall height is the sum of the height of the vanity unit and the height of the basin's rim. This allows for a striking design element, but requires careful consideration of the vanity unit's height.
- Built-in (inserted) sinks. They are flush-mounted into the countertop. The installation level is the same as the countertop. The most ergonomic option for cleaning—there's no step to sweep up water.
Installation technologies: from brackets to installations
The sink mounting method directly impacts the height accuracy and reliability of the entire structure. For massive stone or cast sinks, not only strong fastenings are essential, but also proper foundation preparation. The wall on which the sink is mounted must be load-bearing, made of solid brick or concrete. Plasterboard partitions require pre-strengthening the mounting area with embedded beams or mounting profiles.
Classic installation with brackets or adjustable studs remains the most common method for wall-hung models. The process begins with marking. The desired installation height is marked on the wall. From this mark, the height of the sink itself is measured downwards (measured from the top edge to the bottom of the mounting holes or mounting plate). This is the height at which the brackets will be positioned. After drilling the holes and installing the anchors, the brackets are secured and checked for horizontality with a level. The sink is hung on the brackets, after which the trap and faucet are connected. Important: if there is a gap between the wall and the back of the sink, it must be sealed with sanitary silicone to prevent moisture penetration and mold growth.

- Installation on the installation. The most progressive and convenient method for wall-hung models. The installation's steel frame is attached to the main walls, floor, and ceiling, creating a supporting structure. The basin is attached to this frame using special adjustable studs. The main advantage is the ability to precisely adjust the height within a wide range even after the frame is installed, as well as the perfect concealment of all pipes and filters behind a decorative panel.
- Installation on a cabinet. This is the easiest method in terms of height adjustment, as it is determined by the finished cabinet. It's important to check that the cabinet legs are adjustable, or to place shims under them for leveling. The sink is attached to the countertop from above (overhead) or below (inset) using special clamps and sealant.
- Tulip installation«. The pedestal is not a load-bearing element! The entire load is supported by hidden brackets attached to the wall. The pedestal is simply placed and screwed to the floor for stability. Therefore, markings for the fasteners are made in the same way as for a standard wall-hung basin, and the pedestal is trimmed or installed on spacers to compensate for the height.
Coordination of sink height and utility lines
One common problem with DIY installation is a misalignment between the sink's trap outlet and the sewer pipe inlet. If the sink is elevated above standard while the sewer outlet remains at the same level, the trap will not drain properly and will back up or leak. There are several solutions: raising the pipe, lowering the sink, or using a trap with an adjustable outlet or a horizontal outlet. It's best to anticipate this issue during the rough-in plumbing process by installing the sewer pipe with sufficient height or leaving sufficient vertical clearance for maneuvering. A similar situation applies to the faucet and water supply. Flexible hoses have a limited length, and if the sink is elevated significantly, they may not be long enough. You should either purchase longer hoses in advance or plan for concealed faucet installation with a rigid hose, which can be made from metal-plastic pipes of the required configuration.
Common mistakes and their consequences
Ignoring ergonomic and installation rules leads to problems that only become apparent with constant use. A low-mounted sink forces everyone in the household to slouch. This is not only uncomfortable but can also lead to back pain over time, especially for those who already spend a lot of time sitting. Furthermore, splashes from a low sink are more likely to land on the floor rather than in the bowl, creating a constant puddle and mess. A high-mounted sink, especially for shorter people or children, turns every wash into a stretching exercise, increases the risk of slipping on the stand, and makes it difficult to control the process (for example, it's harder for a child to brush their teeth properly without seeing themselves in the mirror).
- Error in calculation taking into account the finished floor covering. Marking and installation are often done before laying tiles or other flooring. If you don't take into account the future thickness (for example, 1.5 cm of tiles + 1 cm of adhesive), the sink will end up lower than planned. Always base your calculations on the finished, finished floor.
- Neglect of level. Installing the sink "by eye" will guarantee a crooked position. Water will pool at one end, which will be noticeable and difficult to clean. A spirit level at least 60 cm long is essential.
- Insufficient fastening. This is especially true for heavy sinks made of artificial or natural stone. Skimping on brackets or using unsuitable anchors can lead to the sink collapsing along with the faucet and attached pipes.
- Ignoring sealing. An unfilled gap between the sink and the wall creates a direct path for water to seep under the sink and behind the cabinet. Over time, mold will develop, damaging the wall finish, and ruining the furniture.
Sinks installed too high force the use of stands and stools, which can lead to injuries and are simply inconvenient. When installing, pay attention to the sink's position relative to the drain. Otherwise, a number of problems may arise if repairs are needed. The drain pipe and trap openings must be aligned.
Checking for proper installation is simple. Stand in front of the sink in your usual position. Your back should be straight, with no tension in your shoulders or lower back. When lowering your arms to the sink, your elbows should be slightly bent. If you have to bend over or, conversely, raise your arms above a comfortable level, the height is incorrect. Another test is whether the mirror, which is usually hung above the sink, is comfortable to use. Your gaze should fall on the center of the mirror without having to raise or lower your head. By taking the time to carefully calculate and install it properly, you're investing in your comfort and health for years to come, turning your daily routine into a pleasant and safe ritual.