








A leaky bathroom faucet is a familiar situation for everyone. A constant dripping sound, a puddle on the floor, and a mounting water bill all make you think about repairs. Many people immediately think about calling a professional, but often the problem can be solved in half an hour on your own. Modern bathroom faucets with shower heads, despite their apparent complexity, have a fairly simple and logical design. Understanding how they work allows you to troubleshoot 90% problems yourself: replace the gasket, clean the aerator, or replace the cartridge or diverter. You don't need to be a professional plumber to do this—a basic set of tools (an adjustable wrench, screwdrivers, and pliers) and a little patience are all you need. The key is to correctly diagnose the problem and purchase the appropriate repair part.
All bathroom faucets with shower function can be roughly divided into two broad categories based on control type: two-handle (with two valve bodies) and single-lever (with a single lever or handle). In two-handle faucets, temperature and water flow are controlled by separate valves for hot and cold water. Each valve contains a valve body—a device with a rubber or ceramic seal that shuts off the water flow. In single-lever faucets, both temperature and water flow are controlled by moving a single handle. This type of faucet contains either a ball mechanism or a more modern ceramic cartridge. Thermostatic faucets, which automatically maintain a set temperature, deserve a special mention. They are more complex and expensive, but their repair often involves replacing the cartridge itself. Let's look at each malfunction in turn.
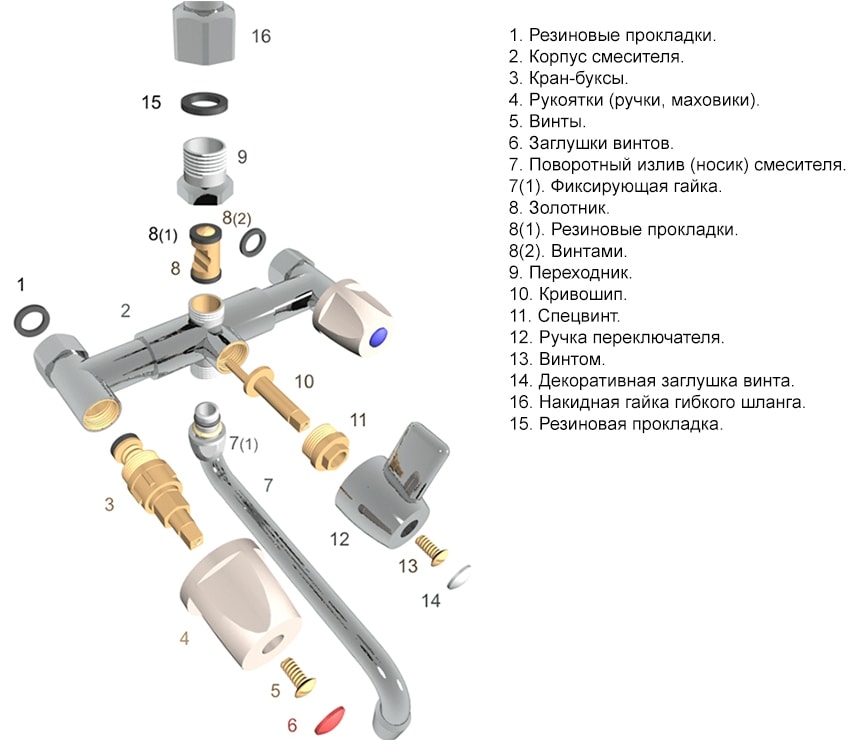
Repairing a two-valve mixer: replacing the gasket and bushing
The most common problem with older faucets is a worn rubber seal on the valve stem. This can manifest itself either as water leaking from under the handle when the faucet is closed, or as a requirement to tighten the valve further to shut off the water. To repair this, turn off the hot and cold water supplies on the risers. Then, remove the decorative caps on the valve stems (usually marked "C" and "H"). Under the cap, you'll find a screw; unscrewing it allows you to remove the valve stem. After this, you'll see the valve stem, screwed into the faucet body. Unscrew it with an adjustable wrench. At the bottom of the valve stem, you'll find a rubber seal held in place by a screw. This seal is often worn, torn, or "wooden." Unscrew the steel screw, remove the old seal, and install a new seal of the same diameter and thickness. Reassemble in reverse order.
If the faucet still leaks after replacing the gasket, the valve seat itself may be worn. It may have developed grooves from the rotation of the old gasket. In this case, lapping the seat can help. This requires a special tool—a milling cutter—that is inserted into the seat and, by rotation, removes a thin layer of metal, smoothing the surface. If such a tool is unavailable and the faucet is inexpensive, it is often easier to replace the entire valve seat. Another option for two-handle faucets is to completely replace the old valve stem with a modern ceramic one. Ceramic valve stems are more durable, operate smoothly, and do not require strong tightening. It is important to select a valve stem with the same thread and stem length to ensure it fits your flywheels.
- Repair tools: adjustable or open-end wrench (10-12), set of screwdrivers (flat and Phillips), knife, pliers, new repair kit (gaskets, valve boxes).
- Gasket replacement procedure: Turn off the water → remove the plug from the valve → unscrew the fixing screw → remove the flywheel → use a wrench to unscrew the valve stem → replace the gasket on the end → reassemble in reverse order.
- If it flows from under the spout (goose): The cause is wear on the sealing ring between the spout and the body. Loosen the nut securing the spout, remove it, replace the sealing ring, and reassemble, wrapping the threads with Teflon tape.
- If it doesn't switch from spout to shower: The spool switch (diverter) is faulty. It needs to be disassembled, the worn rubber seals or rings replaced, or the entire switch needs to be replaced.
- Prevention: Avoid overtightening the valves, as this will wear out the seals and valve seat faster. Periodically (once a year), disassemble and clean the aerator on the spout.
Single-lever mixer repair: cartridge and seal replacement
Single-lever (joystick) faucets are more convenient, and their repair is often even simpler than that of two-handle faucets. All temperature and pressure controls are concentrated in a single module—the cartridge. If water drips from the spout of a closed faucet, or the lever doesn't lock in place, or the water flows only at one temperature (cold or hot), the cartridge is at fault. To replace it, first turn off the water. Then, locate the decorative plug (often blue or red) on the body and pry it off with a screwdriver. Underneath, you'll see a locking screw that holds the lever itself in place. Loosen this screw (you may need a hex key) and carefully remove the lever. It may be a tight fit, but you can gently wiggle it from side to side. Underneath the lever, you'll see a large clamping nut (decorative sleeve). Unscrew it with an adjustable wrench, wrapping it in a rag first to prevent scratching.
After removing the nut, you'll gain access to the cartridge itself. It's simply inserted into the housing. Pull it out. Be sure to note or photograph its orientation—the protrusions and holes on the bottom should align with the grooves in the faucet. Take this cartridge to a plumbing supply store and buy an identical one. They come in different diameters (usually 35 or 40 mm) and different seating patterns. There are no universal cartridges. Install the new cartridge in the correct position, tighten the pressure nut, put on the lever, secure it with the screw, and replace the plug. Turn on the water and test the operation. Replacing the cartridge often resolves all leaking and adjustment issues.
Problems with the shower-spout switch and flexible hose
Bath shower faucets have a second component that often breaks: the mechanism that switches the water flow between the spout and the shower head. In inexpensive models, this is a simple push-button or flag switch, inside which a rod with rubber seals moves. If water leaks from under the switch button or doesn't fully switch to the shower, the seals or the entire switch needs to be replaced. To remove it, you usually need to unscrew the switch itself (it may be threaded) or remove the decorative cap and unscrew the inner nut. Remove the old seals, replace them with new ones from the repair kit, lubricate them with silicone grease, and reassemble.
Another weak point is the flexible hose connections. If water is leaking from under the nuts where the hose connects to the faucet or shower head, the problem is a worn rubber gasket inside the union nut. Turn off the water, loosen the nut with a wrench, remove the old flat gasket, and replace it with a new one of the appropriate diameter. When tightening, do not apply excessive force to avoid stripping the threads on the plastic body of the shower head. Sometimes the hose itself can also leak if the internal rubber tube has burst. In this case, the entire hose must be replaced. When buying a new hose, pay attention to the length and type of connections (most often, these are 1/2-inch nuts). It is better to choose hoses with metal braiding made of stainless steel—they last longer.

- Replacing the cartridge: Turn off the water → remove the decorative plug on the lever → unscrew the fixing screw → remove the lever → unscrew the pressure nut → remove the old cartridge → install the new one in the same position → reassemble in reverse order.
- Cleaning the aerator (mesh on the spout): If the water pressure is weak, unscrew the aerator at the end of the spout with a wrench or pliers (through a cloth). Rinse the mesh under running water and clean it with a needle to remove any limescale deposits.
- Replacing the switch seals: remove the switch button/flag → unscrew the fastening nut → remove the rod with the seals → replace the worn sealing rings → assemble, lubricating with silicone grease.
- Eliminating leaks at joints: Unscrew the union nut (on the hose, connection) → replace the rubber washer inside → carefully tighten the nut without distorting it.
- If there is dripping from the drain hole of the switch: This is a normal occurrence for some models when the shower is turned off—residual water drains from the hose. If water flows continuously, the switch is faulty.
If, after all these steps, the faucet continues to leak, or you can't find the right part, you might want to consider replacing the entire faucet. This is especially true if it's old and heavily limescaled. Modern faucets made of high-quality brass with ceramic cartridges last 10-15 years without repair. When choosing a new one, focus not on design but on repairability: find out if cartridges and repair kits are available, and whether it's easy to disassemble. And remember the golden rule: prevention is best. Install coarse filters at the entrance to your apartment to trap sand and scale, which can damage ceramic and rubber. Periodically (every six months) check the tightness of all external nuts. By following these tips, you can keep your plumbing in perfect working order for many years.