






Buying an acrylic bathtub is always a joy, filled with the joy of choosing a beautiful shape and color. However, many buyers are pressured by salespeople to purchase an additional frame or support structure. This naturally raises the question: is this a marketing ploy or a genuine necessity? The answer is clear: for most acrylic bathtubs, a frame is not just desirable, but absolutely essential. Acrylic, even fiberglass-reinforced, is a flexible and pliable material. Without reliable support across the entire base and sides, the weight of water and people can cause the bathtub to deform, leading to cracks, leaks, and, ultimately, damage to the expensive bathtub. A frame evenly distributes the load, provides rigidity, and ensures the bathtub will last its full lifespan.
There's a common misconception that if a bathtub is placed on a level floor, a frame is unnecessary. This isn't true. Even on a perfectly level surface, the weight is concentrated in a small area of the legs (if included) or along the perimeter of the sides. The acrylic basin experiences dynamic loads when filled and when a person steps into the bathtub: it flexes slightly and "plays." Without support from below, this causes material fatigue at the points of maximum stress (most often at the corners and center of the base). Over time, this leads to the formation of microcracks, which may not be noticeable but will allow water to leak under the bathtub. The consequences include dampness, mold, screed failure, and unpleasant odors. A frame, especially one with transverse stiffeners, transforms the flexible basin into a monolithic structure, completely eliminating such risks.
Types of frames: from factory-made metal to homemade
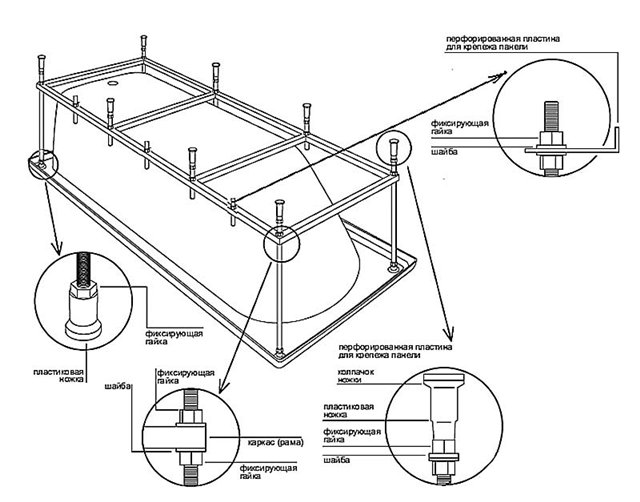
All supporting structures for acrylic bathtubs can be divided into two main types: prefabricated metal frames and permanent foundations, which are constructed on-site from other materials. Prefabricated metal frames are welded structures made of steel sections (most often 20x20 or 30x30 mm square tubing). They are designed by the manufacturer for specific bathtub models, ensuring a perfect fit. A standard frame consists of a perimeter frame supported by height-adjustable feet and one or more crossbars supporting the base. The advantages of this solution are obvious: lightweight, easy installation, precise leveling, and space for utilities and a decorative screen.
Fixed foundations are typically constructed of brick, cinder block, or moisture-resistant plasterboard on metal profiles. They consist of two parallel walls (for straight bathtubs) or a U-shaped profile (for corner bathtubs), on which the bathtub is placed. The space between the walls is often used for storage. The main advantage of a fixed foundation is absolute rigidity and solidity. The disadvantages include high labor intensity, the need to precisely calculate the height taking into account the thickness of the mortar, the inability to adjust it after curing, and the inherently occupied space under the bathtub. This method is often used in complex layouts, when the bathtub is built into a cabinet or niche, or when the floor has a significant slope that is difficult to compensate for with adjustable feet.

Brick foundation: a classic of reliability
Installing a bathtub on brick supports is a method that has been tried and tested for decades. It remains popular, especially for heavy cast iron and steel bathtubs, but it can also be used for acrylic bathtubs. The process is as follows: the bathtub is turned over and placed in the desired installation location. The future support walls are marked on the floor along its outline. Typically, these are two parallel partitions located 20-30 cm from the edges of the bathtub. It's important that they extend under the most rigid parts of the bathtub—the sides, where the supporting frame is located. Next, the walls are laid out of red ceramic or sand-lime bricks using a cement-sand mortar.
The key is creating a slope toward the drain. To achieve this, the front (foot) wall is 1-2 cm lower than the back. The slope is checked with a long spirit level. After the walls are laid and the mortar has set (at least 24 hours), a thick layer of the same mortar or foam is applied to their upper surface. Then, the bathtub (with the trap already installed) is carefully lowered and pressed to the floor. Any excess mortar that has spilled out is removed. It's important to constantly monitor the level during installation: the bathtub should be strictly horizontal lengthwise, but with a crosswise slope. The advantage of this method is that the entire bottom of the bathtub rests on a level, monolithic foundation, eliminating any sagging. The disadvantage is that the plumbing underneath cannot be repaired without dismantling. Therefore, all connections must be completely sealed, and access to the trap is best provided through a decorative screen with latches or magnets.
- Materials: bricks (50-70 pcs. for a standard bath), M400 cement, sand, water for mortar, waterproofing film or mastic for brick processing.
- Tool: trowel, level, tape measure, spatula, container for mortar, grinder with a stone disc for cutting bricks.
- Work order: marking the floor, preparing the mortar, laying the first and second retaining walls with level and slope control, drying for 24 hours, applying the mortar to the masonry, installing the bathtub, sealing the joints with the wall.
- Important nuances: Brick supports should be spaced 2-3 cm from the walls to allow for thermal expansion and ventilation. It's advisable to waterproof the floor beneath them before laying.
Factory metal frame: installation and adjustment
Installing a bathtub on a prefabricated metal frame is the fastest and cleanest method. It begins with checking the package contents. The box should contain: the frame itself, adjustable feet (usually 6-8), mounting plates or brackets for securing the bathtub to the frame, decorative foot caps, and all necessary wrenches. First, assemble the frame on the floor (without the bathtub) according to the instructions. Then, position it in the desired installation location. Using a level and the adjusting screws on the feet, align the frame perfectly horizontally in all planes. A 1-2 cm slope toward the drain hole is essential. This can be achieved by slightly lowering the feet relative to the feet at the head of the frame.
Once the frame is level, the legs are secured with locknuts to prevent them from shifting during further work. Next, the bathtub is placed on the frame. It should fit snugly around the perimeter of the frame. Often, special soft spacers or rubber pads are included in the kit, which should be placed between the edge of the bathtub and the metal frame to prevent creaking and point loads. The next step is securing the bathtub to the frame. This is usually done using special slotted plates that are screwed to the inside of the edge (in designated locations, not all the way through!). The plate is then screwed or clipped to the frame. This prevents the bathtub from accidentally shifting relative to the base. After securing, the trap and overflow are connected, and a test fill with water is performed to check for leaks and to ensure the structure has settled completely.

It should be noted that installing a steel bathtub on a finished frame yourself is carried out in exactly the same way as described above.
Advantages and disadvantages of a factory frame
- Pros: Easy and quick installation (1-2 hours), the ability to precisely adjust the height and slope on uneven floors, the availability of free space under the bathtub for laying utilities and their maintenance, ventilation of the space under the bowl, which prevents the formation of condensation and mold, the ability to easily dismantle the bathtub if necessary for repairs or moving.
- Cons: Additional cost, the metal frame may creak under load if damping pads have not been installed, limited maximum load (check the specifications), and for non-standard bathtub shapes, the frame may be expensive or unavailable.
Making your own metal frame
If you can't find a frame for your bathtub model, or one seems too expensive, you can build your own support structure. This will require metalworking skills and a welding machine, but will be 2-3 times cheaper. You'll need: 20x20 or 25x25 mm steel profile tubing (the length is calculated based on the bathtub perimeter plus the crossbars), 3-4 mm thick steel plates for attaching the legs, 15-20 cm long M10 or M12 threaded rods for the adjustable legs, nuts and washers for the rods, primer, and metal paint. Tools required: a welding machine, an angle grinder, a drill, a tape measure, a square, and a level.
The work begins with precise measurements. The bathtub is turned upside down. The external dimensions along the sides are measured. The frame should be 2-3 cm smaller than these dimensions on each side to prevent it from bulging outward. A frame is welded from profile tubing, precisely matching the shape of the bathtub. For straight bathtubs, this is a rectangle; for corner bathtubs, an L-shaped structure. Vertical posts, made of the same profile or angle iron, are welded to the corners of the frame and in the middle of the long sides. Plates with pre-drilled holes for studs are welded to the lower ends of the posts. The studs are screwed into nuts welded to these plates; these will serve as leveling feet. Inside the frame, parallel to the short sides, one or two crossbars made of pipe are welded to support the bottom of the bathtub. They should be located under the most rigid parts of the bottom (usually where the manufacturer's stiffening ribs are).
After welding, all seams are cleaned, the frame is degreased, and coated with an anti-corrosion primer and paint. Welded areas require particular care. After the paint has dried, two nuts (one locking and one adjusting) are screwed onto the studs, and rubber or plastic pads are installed to prevent scratching the floor. The finished frame is installed in place, leveled using a level and the nuts on the studs, and the bathtub is then carefully lowered onto it. The bathtub can be secured to the homemade frame using perforated mounting tape and screws into the end of the edge (only in designated areas, not through!). The main advantage of a homemade frame is the ability to customize it to your needs, for example, by increasing the number of support points or making it higher or lower than standard.
- Material calculation: measuring the outer perimeter of the bathtub, determining the number of vertical posts (at least 6: at the corners and in the middle of the long sides), calculating the length of the pipe for the frame and crossbars.
- Cutting and welding: cutting the pipe to size, assembling the frame on a flat surface using tack welding, checking the diagonals, final welding of all seams, welding of the vertical posts and crossbars.
- Making the legs: welding the mounting plates to the posts, welding the nuts to the plates, screwing on the studs.
- Corrosion protection: cleaning the weld seams with a grinding wheel, degreasing the entire structure, applying primer and paint in 2 layers.
- Assembly and adjustment: Install the frame on the floor, adjust the height of each leg using two nuts on the stud to achieve the perfect level and desired slope.
- Bath installation: laying soft pads on the frame, carefully installing the bathtub in place, securing the bathtub to the frame through the sides, connecting the siphon.
Regardless of the frame type chosen, installation is not a finishing touch, and should not be skimped on. The longevity and trouble-free operation of your acrylic bathtub directly depend on the quality of the supporting structure. Spending a few hours on precise adjustments or a day laying the brick foundation will ensure years of comfortable use without creaking, sagging, or unexpected leaks. Remember, a properly installed bathtub is not only a hygiene item but also a place of rest and relaxation, destined to evoke only positive emotions.