








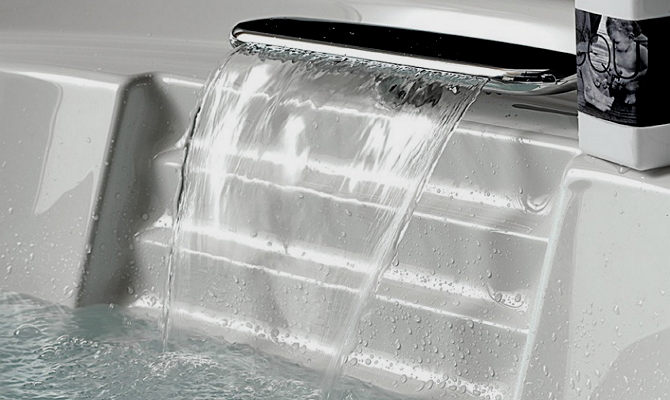
If you're tired of classic faucets with long spouts that require constant turning and break under constant movement, it's time to consider cascade models. These faucets dramatically change not only the appearance of your bathroom but also the process of filling the bathtub. Instead of a narrow stream, you get a wide, gentle waterfall that fills the tub much faster and almost silently. Their main difference is that they are installed directly on the bathtub rim, freeing up the wall and creating a more ergonomic space. Many people mistakenly consider these models simply a design fad, but in practice, they solve a host of household problems, from saving time to increasing the reliability of the system.
A cascade mixer tap operates on a simple principle: water is supplied through a wide, flat nozzle rather than a narrow opening with an aerator. This increases flow rate, and the stream itself becomes soft and dense. The absence of an aerator, which often becomes clogged with limescale, is another advantage for those with hard tap water. Structurally, these models can be either a monolithic unit combining all controls, or a separate system, with the taps, diverter, and spout located separately. This opens up wide layout options, especially in non-standard or confined spaces.
Application areas and design features
Cascade faucets are versatile. They can be found not only on bathtub rims but also on vanities, kitchen sinks, and even as the main spout for shower trays. In the bathroom, they most often comprise a system of several independent modules. A typical set includes: separate or combined hot and cold water taps, a mixing chamber, the cascade spout itself, a diverter from the shower to the spout, and a pull-out or fixed shower head with a hose. The number of modules varies from three to five, depending on the configuration and functionality.
Installation is possible in several ways: directly into the special holes in the edge of an acrylic or steel bathtub, on the wall next to the fixture, or on a special console shelf. The choice of installation method depends on the design of your bathtub and your willingness to make additional holes. Important: if your bathtub already has standard tap holes, you must either select a model that precisely matches these dimensions or be prepared to modify them, which requires care, especially with acrylic bathtubs.
Pros and cons: weighing before buying
Before deciding to purchase, it's worth objectively assessing all the strengths and weaknesses of such a solution. Let's start with the advantages, of which there are indeed many. Besides the obvious aesthetic appeal and the unique atmosphere they create in the bathroom, cascade faucets are very practical. The wide spray reduces the time it takes to fill the bathtub by 30-40%, significantly saving water and time, especially for larger bathtubs. The absence of splashes and the quiet sound of running water provide comfort that every household will appreciate. The design, free from constant twisting of the spout, is more robust internally—there's simply nothing to loosen. The integrated shower hose, which retracts into a special niche, keeps the rim clean.
However, there are also disadvantages that are often overlooked in the flashy advertising brochures. The most important is the vulnerability of the shower hose. Frequent removal and cleaning can cause it to kink in the same spot, which leads to rapid wear of the inner lining and leaks. If you rarely shower, this problem is less of a concern, but in families where the bathtub and shower are used alternately, replacing the hose can become a regular procedure. Another issue is the backlight. Models with LED backlighting look fantastic, but if even one diode fails, repairs are extremely difficult due to the difficult access to the components. Furthermore, such faucets require grounding in the bathroom's electrical system, which is not available in every older home. And, of course, there's the price. A high-quality cascade faucet will cost several times more than a good classic model.
- Advantages: High-speed bathtub filling, minimal noise and splash levels, stylish design, increased mechanical reliability, concealed shower hose installation, and ample interior integration options.
- Flaws: High cost, vulnerability of the shower hose to kinks, difficulty in repairing built-in lighting, the need for grounding for models with electric lighting, and high demands on installation quality.
Price range and factors affecting cost
The price range for cascade faucets is quite wide. At the lower end are simple models without backlighting from lesser-known brands, available starting at around 5,000 rubles. The mid-range segment, featuring products from trusted manufacturers with high-quality workmanship and materials (brass, ceramic cartridges), offers models ranging from 15,000 to 40,000 rubles. At the higher end are designer-designed models, complex systems with backlighting, touch controls, and exclusive finishes, which can cost up to 100,000-150,000 rubles and more.
The final price is influenced by a number of factors. First, brand. European manufacturers are traditionally more expensive, but often offer better casting quality and durable fittings. Second, material. Silumin (aluminum alloy) faucets will be cheaper but less durable than brass ones. Third, technology. Self-regulating thermostatic cartridges, water-saving systems, and vandal-resistant coatings all add to the cost. Fourth, accessories. The inclusion of lighting, a multi-mode pull-out shower, and a remote control automatically pushes the model into a higher price category. Don't forget the cost of installation either. Installing a cascade faucet is more complex than a standard one, and a qualified plumber can add another 2,000 to 5,000 rubles to the budget.
In addition to the cost of the mixer itself, you also need to take into account the cost of installation by a specialist.
The structure and operating principle of the modular system
To understand how to maintain such a mixer tap and what can go wrong, let's take a closer look at its design. The modular system is based on the independent placement of its components. The main components are: a hot water inlet valve, a cold water inlet valve (or a single, two-handle or single-lever unit), a mixing chamber where the water flows meet and are equalized in temperature, a mechanical or electronic flow switch from the spout to the shower, and, of course, the cascade nozzle. The shower hose and hand shower are connected to a separate outlet.
The key element is the mixing chamber and thermostatic element (if present). Advanced models include a thermostat that maintains the set water temperature regardless of pressure fluctuations in the system. This isn't just a convenience feature, but also an important safety feature, especially if there are children in the house. The cascade nozzle itself is typically made of brass with a chrome or matte finish, and contains a diffuser that creates a wide, flat stream. This diffuser can become clogged with scale over time, so periodic cleaning is essential.
- Inlet valves: They are responsible for the supply and primary regulation of cold and hot water. They can be ceramic (more durable and smooth) or rubber (easier to repair, but wear out faster).
- Mixing unit: The heart of the system. This is where most of the mixing occurs. In inexpensive models, this is a simple cavity; in more expensive models, it's a complex labyrinth with a thermostatic valve.
- Spout (goose): The outlet is not round, but slit-shaped. Its width determines the nature of the stream. The wider the spout, the more "waterfall-like" and calm the stream will be.
- Shower/spout switch: Most often, it's mechanical, with a ceramic or ball valve. It's this component that requires periodic maintenance in hard water conditions.
- Shower set: A stainless steel braided hose and shower head. The quality of the hose is critical, as it is subject to constant mechanical stress.

Criteria for choosing the right acrylic bathtub
Choosing a cascade mixer tap for an acrylic bathtub has its own specifics. Acrylic is a soft material, and an improperly installed or selected mixer tap can, over time, cause the rim to warp or crack around the mounting holes. The first thing to consider is the mounting method. Some models are mounted through the rim using clamping nuts and wide damping washers. This mounting method is gentler on the acrylic than a rigid bolted connection. The second key factor is matching the center-to-center spacing of the supply lines to the location of the mounting holes on your bathtub.
The weight of the faucet itself is equally important. The heavy brass structure, mounted on the thin rim of an acrylic bathtub, creates a constant load. Ideally, the bulk of the weight should be supported by a support platform or frame, rather than hanging solely from the rim. It's also worth considering the surrounding space in advance: a wide spout requires ample space, otherwise water will hit the opposite rim, creating noise and splashing. The color and style, of course, should harmonize not only with the bathtub but also with the rest of the bathroom fixtures and decor. Matte finishes (matte chrome, matte gold) are currently trending; they hide water marks and stains better than classic glossy chrome.
- Mounting method: Systems with soft pads and load distribution are preferable to those with rigid clamping.
- Weight of the structure: For thin-walled acrylic bathtubs, it is better to choose lightweight models or provide additional support.
- Length and shape of the spout: The spout should match the width of the bathtub. A spout that is too short will prevent water from flowing into the center, while one that is too long will be inconvenient.
- Quality of fittings: The smooth operation of levers and valves speaks to the quality of the internal mechanism. Play and creaking are signs of cost-cutting.
- Equipment: Check that all necessary gaskets, fasteners, and trim are present. Missing them will result in an unnecessary trip to the store.
DIY installation: step-by-step instructions
Installing a cascade mixer tap on an acrylic bathtub is a doable task for anyone with steady hands and minimal plumbing experience. The key to success is precision and unhurriedness. Start with preparation. Remove the bathtub from its permanent location, if possible. Working with it on the floor is much more convenient and safer. Carefully study the manufacturer's instructions, paying particular attention to the connection diagrams and recommended hole diameters. If instructions are unavailable, search for them online for your specific model—this will save you a lot of hassle.
The next step is marking. Arrange all the faucet components on the bathtub rim as they should be. Use a marker or pencil to mark the centers of the future holes. It's crucial to check that the internal reinforcement ribs or the bathtub's supporting structure don't interfere. Drilling the holes is the most critical step. Never use regular metal or wood drill bits for acrylic—they will tear the material. Use special fine-tooth hole saws or spade bits for plastic. Work at low speeds, apply gentle pressure, and constantly cool the area with water.
It should be noted that the installation is carried out on a bathtub removed from its permanent installation location.
Once the holes are prepared, you can begin assembly. Start by installing the mixer blocks and faucets. Be sure to install all the rubber or silicone sealing gaskets included in the kit. Tighten the mounting nuts carefully with a wrench, without overtightening, to avoid stripping the threads and deforming the acrylic. Next, connect the siphon and all flexible supply hoses. There is only one rule: all connections must be dry and clean, and the gaskets must be in place. Before final installation of the bathtub, be sure to conduct a hydrostatic test. Connect the hoses to the water supply, turn on the water, and carefully inspect all components for even the smallest leaks. Only after ensuring everything is dry can you install the bathtub on the frame and make its final connection to the sewer system.
- Tool: tape measure and marker for marking, screwdriver with a set of bits, crown or spade bit of the required diameter (usually 35 mm or 40 mm), set of open-end wrenches, adjustable wrench, pliers, sealant (plumbing silicone), fum tape or thread.
- Preparation: disconnect the bathtub from the utilities, remove it from its place, clean the surfaces in the installation area from dust and dirt.
- Marking and drilling: precise marking of hole centers using a template or mixer elements, drilling at low speeds with cooling.
- Rough assembly: installation of the main elements of the mixer through the holes, temporary fixation.
- Connection: Connecting flexible hoses to the water supply and connecting the siphon to the sewer outlet. Sealing all threaded connections.
- Examination: test water supply, pressure leak test, inspection of all connection points.
- Finishing installation: If the test is successful, the bathtub is installed in its permanent location, the fasteners are finally tightened, and the joints with the wall are sealed with sealant.