








The first thing a new summer cottage owner thinks about isn't the house or the garden, but the need to build a toilet. Without this simple structure, a comfortable stay in the countryside is simply impossible. Of course, you can order a ready-made structure or hire a team, but for many summer residents, building a toilet themselves isn't just a matter of saving money but also a kind of ritual of reclaiming the property, the first step toward landscaping. Fortunately, this task is quite feasible even for a construction novice, with a smart and thorough approach.
The process consists of several key stages: selecting a location based on sanitary standards and wind conditions, determining the toilet type (pit latrine, composting toilet, powder closet), designing and building the stall, and installing the interior fittings. Each stage has its own nuances, the neglect of which can lead to unpleasant consequences: unpleasant odors, conflicts with neighbors, or rapid failure of the structure. Let's break it down step by step to ensure your country toilet is convenient, hygienic, and durable.
Planning: location, type of construction and sanitary standards
Choosing a location is a fundamental step. A mistake here can ruin the entire pleasure of using the toilet. According to sanitary regulations, the distance from a toilet to a well, borehole, or any other source of drinking water should be at least 25-30 meters. It should be at least 1 meter from the boundary of a neighboring property, and at least 12 meters from a residential building (your own or a neighbor's). These regulations are designed to protect the soil and water from contamination. It's also important to consider the prevailing wind pattern in your area to ensure that prevailing winds don't carry odors toward your house, gazebo, or recreation area.
Avoid placing the toilet in a low-lying area. During rain or snowmelt, water will accumulate there, leading to flooding of the septic tank, dampness in the stall, and accelerated wood rot. Ideally, find a dry, elevated location at the rear of the property, but consider ease of access. If the property is uneven, it's best to build the toilet at the highest point. Also, consider access for a sewage truck if you're planning a toilet with a large septic tank.
- From the water source: at least 25-30 meters to protect against bacteriological contamination.
- From the plot line: at least 1 meter to avoid conflicts with neighbors.
- From a residential building: 12 meters or more, taking into account the prevailing wind direction.
- By height: Avoid low-lying areas and places where melt/rainwater accumulates.
- For convenience: ensure free access and, if necessary, access for equipment.
What type of toilet should I choose for my summer house?
There are several fundamentally different types of country toilets, and the choice depends on the groundwater level, frequency of use, budget, and readiness for maintenance.
Pit toilet A classic dacha toilet. A 1.5-2 meter deep hole is dug under the cabin, the walls of which are reinforced with concrete rings, brick, slate, or old tires. A ceiling with a hole for a toilet seat is built on top. Pros: simple design, low cost, low maintenance (cleaning every few years). Cons: risk of soil contamination due to high groundwater levels, odor, and the need for a sewage truck to pump out the waste.
Air-closet – an improved version with a sealed cesspool. It is often built as an extension to the house, with the cesspool located outside, at an angle, and with a manhole for pumping. This is a more hygienic option, but also more complex to construct.

Powder closet – a system without a deep pit. Instead, a sealed container (bucket, bin) is installed under the toilet seat. After each use, the waste is dusted with a dry material: peat, sawdust, ash, or a special mixture. This blocks odors and initiates the composting process. Pros: environmentally friendly, portable (the container can be taken out and emptied into the compost pile), suitable for areas with high groundwater. Cons: the need to constantly keep a supply of dust and regularly empty the container manually.
Biotoilet – a ready-made commercial solution. There are peat-based models (similar to powder toilets, but with a more advanced ventilation and liquid separation system) and chemical models (using reagents that break down waste). Chemical composting toilets require caution – some reagents are toxic and unsuitable for soil fertilization. Peat-based models are completely environmentally friendly. The advantages of commercial models are hygiene, compactness, and odorlessness. Disadvantages include high cost and the need to purchase consumables (peat, liquid).
Interior design: from a wooden "throne" to a plastic toilet
The heart of any toilet is the seat. The simplest and cheapest option, which can be built in a couple of hours, is a wooden platform, or "step." A frame about 40 cm high is built from lumber and covered with boards. An oval opening is cut in the top platform. To make the seat more comfortable and hygienic, a standard plastic toilet seat, available at any hardware store, can be attached to it. This platform is simple, inexpensive, and reliable, but has a significant drawback: the gaps between the boards are difficult to clean.
A more permanent option is to install a real country toilet. These come in plastic and ceramic. Plastic toilets are lightweight, inexpensive, frost-resistant, and easy to clean. They can be installed directly on a wooden floor, after securing the joists. Ceramic toilets are heavy and require a strong, level foundation, often concrete. Their main advantage is their aesthetic appeal and the feeling of "urban" comfort. When installing any toilet, it is important to properly connect it to the ventilation pipe and seal the connection to the septic tank or holding tank.
The ventilation system deserves special mention. Without it, even the best toilet will generate odors. The simplest ventilation system is a 100 mm diameter pipe, one end of which is lowered into the cesspool (or placed directly behind the toilet), and the other extends 0.5-1 meter above the stall roof. A deflector is recommended at the top of the pipe to enhance draft and protect against precipitation. For peat composting toilets and powder closets, ventilation is essential and is usually built into the design.
- Wooden podium with removable seat: low-cost, easy to manufacture, but less hygienic due to cracks.
- Plastic country toilet: Lightweight, frost-resistant, hygienic, and easy to clean. A strong base is required for mounting.
- Ceramic toilet: Aesthetic, comfortable, and heavy. Requires a solid foundation and freeze protection if the toilet is not heated.
- Ventilation pipe: A mandatory element for removing odors and gases. Diameter: 100 mm, height above the roof: at least 0.5 m.
- Lighting: natural (window) or artificial (battery-powered flashlight, LED lamp with battery).

Building a cabin: materials, foundation, roof
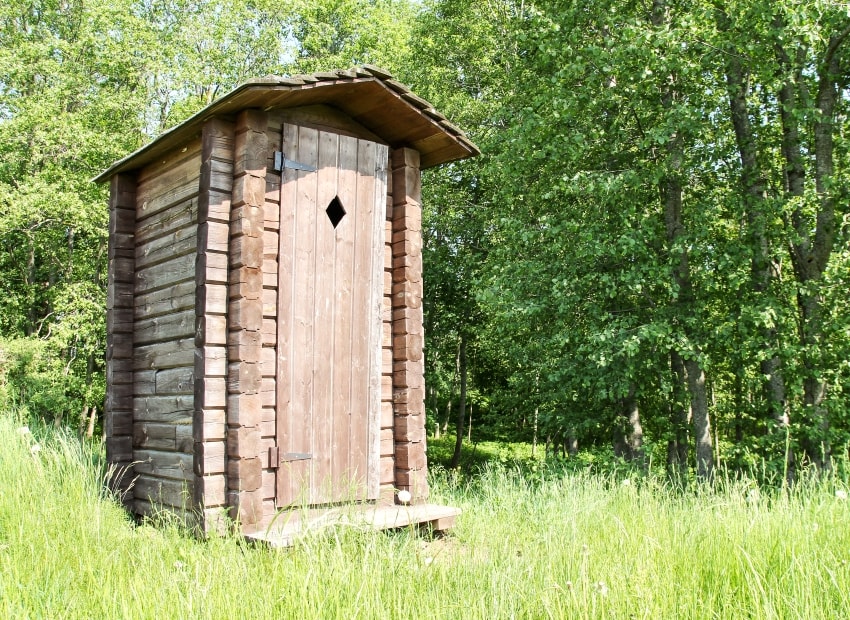
The "booth" itself defines the toilet's appearance. Wood remains the most popular material: it's affordable, easy to work with, breathable, and creates a cozy atmosphere. 50x50 mm or 50x100 mm lumber is used for the frame, and paneling, blockhouse, edged boards, or tongue-and-groove boards are used for the cladding. The wood should be treated with a preservative against rot and mildew, and after assembly, painted or varnished to protect against moisture.
For a more modern and practical look, you can use moisture-resistant OSB or cement-bonded particle board (CBPB), then apply a decorative finish such as siding or exterior paint. Metal frame profiles and corrugated sheeting for the cladding are an option for those who prefer a high-tech style, but such a toilet will become very hot in the sun and freeze in the winter. Pre-fabricated plastic stalls are sold pre-assembled; all that remains is to install them on the prepared platform. They do not rot, rust, and are easy to clean, but they may be unstable in strong winds.
The foundation for a lightweight wooden cabin can be columnar. Simply dig in or concrete four concrete blocks, brick posts, or asbestos-cement pipes filled with crushed stone at the corners. A lower frame of timber treated with bitumen mastic is laid on top of these. If the soil is unstable or the cabin is heavy (for example, made of brick), a strip foundation is better. The roof is usually pitched slightly back to allow for water drainage. The roofing material can be slate, metal roofing, corrugated metal, or soft asphalt shingles. A canopy over the door is required.
- Wooden frame with clapboard sheathing: Traditional, affordable, and environmentally friendly. Requires regular maintenance and painting.
- Frame made of metal profile with corrugated sheet cladding: Durable and modern. It gets very hot and cold, and can rattle in the rain.
- Plastic ready-made cabin: Quick installation, no finishing required, hygienic. May not be strong and stable enough.
- Columnar foundation: Suitable for lightweight structures, easy to implement, provides ventilation under the floor.
- Single-pitched roof: Simple design, effective drainage. The material should match other structures on the site.
Design and additional amenities
A country outhouse doesn't have to be a dreary, gray cubicle. It can be transformed into a beautiful addition to your property. Paint it brightly, create carved frames, and plant climbing plants (maiden grapes, hops, ivy) around it. A window isn't just a source of light but also a design element. It can be round, arched, or with colored glass. You can also create a cozy atmosphere inside: hang a small washbasin with a hanging spout, a coat hook, and a shelf for toilet paper and air freshener. If the outhouse has electricity (a rarity in a country house), you can install a light fixture and even a small outlet for charging a phone.
Odor control is crucial. Besides ventilation, special bioactivators for cesspools (they accelerate waste decomposition and reduce odor), peat backfill for powder closets, and regular bleach or ammonia added to the pit periodically help. The door should close tightly, and it's best to leave a small gap at the bottom to allow airflow, which is necessary for the ventilation pipe to draw air.
Ultimately, building a country outhouse yourself is a completely doable task. It requires less professional skills than precision, attention to detail, and adherence to simple rules. A well-chosen location, a well-designed pit or storage tank, a well-built stall, and thoughtful interior details ensure you'll enjoy this structure comfortably for years to come. And the satisfaction of constructing a desirable structure on your own land is the very "country romance" that many people seek in the countryside.